

I remember the first time my aunt, a passionate advocate for plant-based living, attempted to make vegan ice cream at home. It was a well-intentioned effort, but the result was a rather icy, crystalline concoction that, while edible, lacked the creamy indulgence we all associate with true ice cream. She sighed, “It seems some things are just meant to be made with dairy, or with a fancy machine.” For years, that sentiment lingered in my mind, a quiet challenge to the notion that a truly luscious, coconut milk vegan ice cream was an unattainable dream without specialized equipment.
However, my culinary journey, much like life itself, has taught me that innovation often arises from limitation. Faced with a desire for a rich, dairy-free frozen treat and a distinct lack of an ice cream maker, I embarked on a quest to defy conventional wisdom. My goal was simple yet ambitious: to create a 3-ingredient mango ice cream that was not only vegan but also boasted an unparalleled creaminess, rivaling its dairy counterparts. What I discovered was a method so straightforward, so effective, that it has since revolutionized my approach to homemade desserts. This recipe, which I am thrilled to share with you today, proves that the magic of a perfectly scoopable, intensely flavorful ice cream is well within reach for everyone, regardless of their kitchen gadgetry.
Why This Recipe Will Transform Your Dessert Game
This recipe is more than just a set of instructions; it is a testament to the power of simplicity and the art of understanding ingredients. It offers a solution to the common pitfalls of no-churn ice cream, delivering a product that is consistently smooth, rich, and utterly satisfying. The beauty of this approach lies in its minimalist nature, requiring only a handful of readily available ingredients and no specialized equipment. This makes it an ideal choice for busy individuals, those with dietary restrictions, or anyone seeking a delightful homemade treat without the fuss.
The Allure of Simplicity: Just 3 Core Ingredients
One of the most compelling aspects of this recipe is its brevity in the ingredient list. We are talking about just three primary components that, when combined with a touch of culinary understanding, yield a dessert of remarkable quality. This simplicity translates directly into a cleaner, purer flavor profile, free from the artificial additives and stabilizers often found in commercial ice creams. It allows the natural richness of the coconut and the sweetness of the chosen sweetener to shine through, creating a genuinely wholesome and delicious experience. Furthermore, the absence of complex components means less shopping, less preparation, and ultimately, more time to enjoy the fruits of your labor.
No Ice Cream Maker? No Problem!
For many home cooks, the lack of an ice cream maker has been a significant barrier to entry into the world of homemade frozen desserts. Traditional ice cream machines work by continuously churning the mixture as it freezes, a process crucial for incorporating air and preventing the formation of large ice crystals. Without this constant agitation, homemade ice creams can often turn out hard and icy, a far cry from the smooth, creamy texture we desire. However, this recipe cleverly bypasses the need for a machine by leveraging the unique properties of its core ingredients. The method employed here mimics the essential functions of an ice cream maker, ensuring that your final product is wonderfully airy and delightfully smooth, without any specialized equipment.
Unparalleled Creaminess: A Texture Revelation
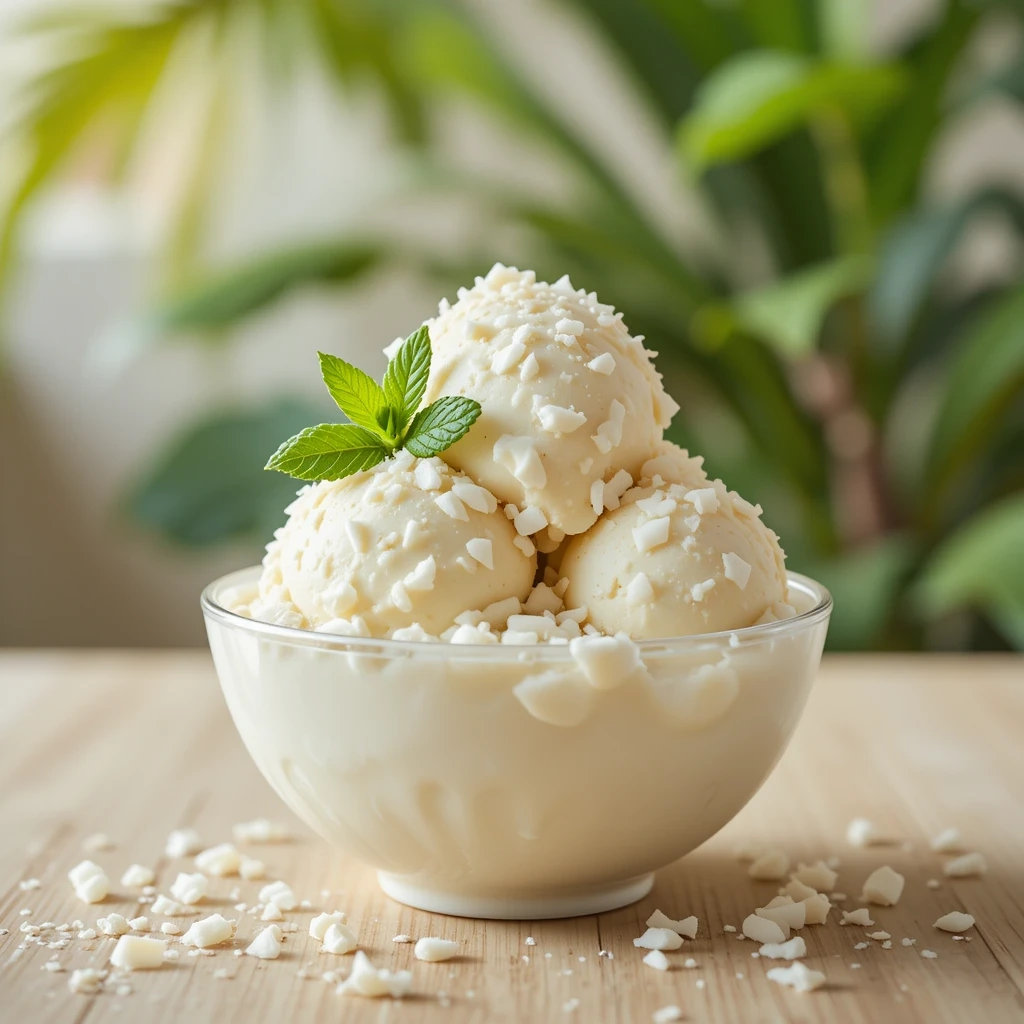
Perhaps the most impressive feature of this recipe is the incredibly creamy texture it consistently delivers. I have personally experienced the disappointment of no-churn recipes that promise creaminess but deliver a block of ice. This recipe, however, is different. It achieves a luxurious, scoopable consistency that is remarkably similar to traditional churned ice cream. The secret lies in the careful balance of fats and sugars, combined with a specific technique that introduces and preserves air within the mixture. This meticulous approach ensures that the ice cream remains smooth and free from those unwelcome ice crystals, providing a truly indulgent mouthfeel with every spoonful.
Pure, Unadulterated Flavor: A Tropical Escape
When you make ice cream at home, you have complete control over the quality and intensity of the flavors. This recipe, in particular, allows the natural, tropical essence of coconut to take center stage. Unlike many store-bought vegan ice creams that can sometimes taste artificial or overly processed, this homemade version offers a clean, authentic flavor that is both refreshing and deeply satisfying. It is a taste of pure, unadulterated goodness, a mini-vacation for your taste buds with every bite. The ability to customize the flavor with optional add-ins further enhances its appeal, allowing you to tailor each batch to your personal preferences.
Make-Ahead Friendly: Convenience at Its Best
In our fast-paced lives, convenience is often a key consideration when it comes to meal preparation and dessert planning. This coconut milk vegan ice cream recipe excels in this regard, as it is perfectly suited for making ahead of time. Once prepared, it can be stored in the freezer for up to two weeks, making it an ideal option for entertaining, meal prepping, or simply ensuring you always have a delightful treat on hand. This make-ahead capability not only saves time but also allows the flavors to meld and deepen, often resulting in an even more satisfying experience when it is finally time to serve. The ability to prepare a gourmet-quality dessert in advance is a significant advantage, offering both flexibility and peace of mind.
The Science Behind the Creaminess: Why This Works
My journey to perfecting no-churn ice cream has been filled with both triumphs and failures, each experience contributing to a deeper understanding of the underlying science. I have learned that achieving that coveted creamy, scoopable texture without an ice cream maker is not merely a matter of luck but a precise application of culinary principles. The key lies in understanding how to manipulate the freezing process to prevent the formation of large ice crystals, which are the primary culprits behind icy, hard ice cream. This recipe employs a brilliant combination of ingredients and techniques that effectively replicate the conditions created by an ice cream machine, ensuring a consistently smooth and luxurious result.
The Magic of Full-Fat Coconut Cream
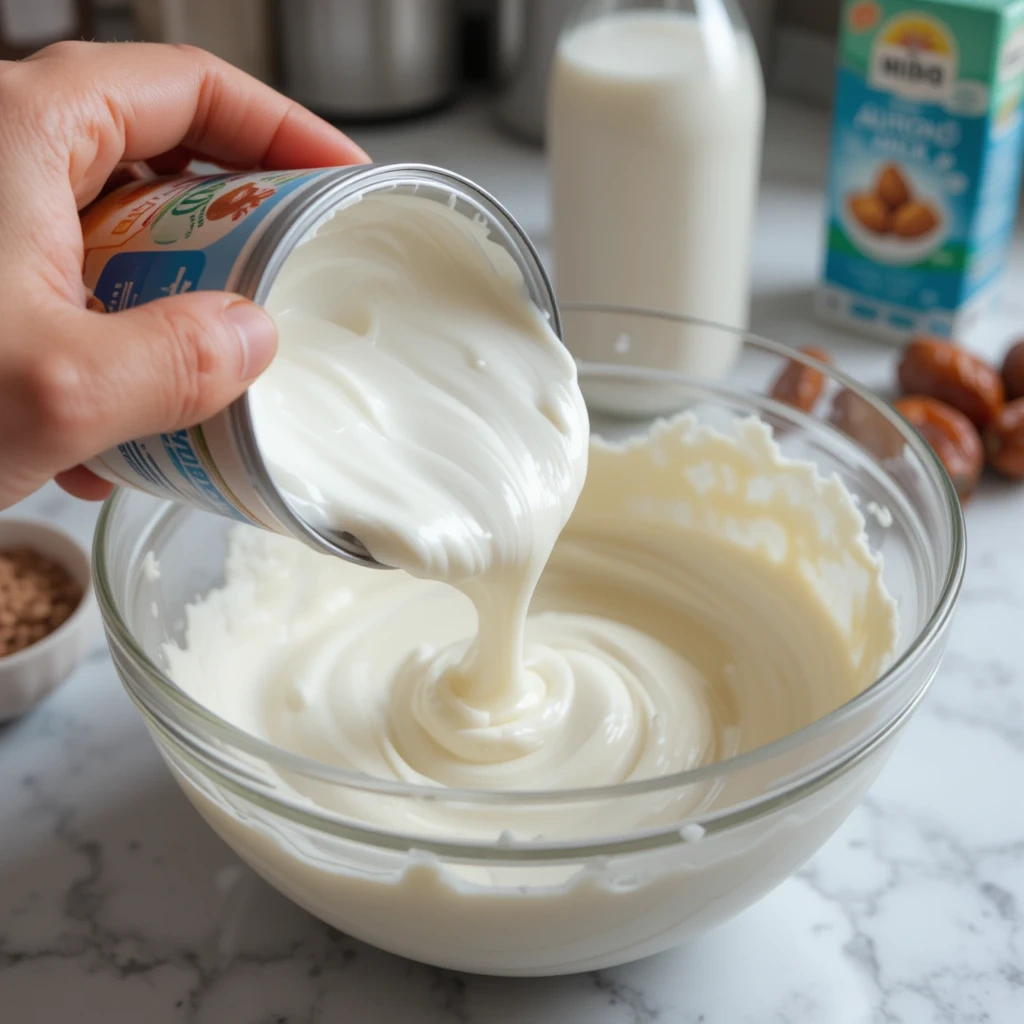
The foundation of this recipe’s success lies in the use of full-fat coconut milk or cream. This ingredient is a true marvel in the world of vegan desserts, offering a richness and creaminess that closely mimics dairy. The high fat content of coconut cream plays a crucial role in preventing the formation of large ice crystals during freezing. Fat molecules interfere with the water molecules’ ability to crystallize, resulting in a smoother, more pliable texture. Furthermore, the natural emulsifying properties of coconut cream contribute to the overall stability and consistency of the ice cream base. It is this inherent richness that allows us to achieve a truly indulgent mouthfeel without the need for dairy, making it an indispensable component of this coconut milk vegan ice cream.
Natural Sweeteners: Beyond Just Taste
The choice of sweetener in this recipe, whether dates or maple syrup, serves a dual purpose: it provides natural sweetness and contributes significantly to the ice cream’s scoopability. Sugars, by their very nature, lower the freezing point of liquids. This means that a mixture with a higher sugar content will freeze at a lower temperature, preventing it from becoming rock-hard in the freezer. Dates, in particular, offer a complex sweetness and a natural stickiness that further enhances the texture. Maple syrup, on the other hand, provides a clean, nuanced sweetness that complements the coconut flavor beautifully. Both options ensure that the ice cream remains pliable and easy to scoop directly from the freezer, eliminating the need for prolonged thawing.
The Whipping Technique: Incorporating Air for Lusciousness
The whipping of the chilled coconut cream is arguably the most critical step in achieving the airy, luscious texture that defines this no-churn ice cream. Traditional ice cream machines churn the mixture to incorporate air, which creates a light, fluffy consistency and prevents the formation of dense ice. Without a machine, we must manually introduce this air. Whipping the coconut cream to stiff peaks creates a stable foam, trapping countless tiny air bubbles within the mixture. When this aerated cream is gently folded into the sweetened base, these air bubbles are preserved, resulting in an ice cream that is light, fluffy, and incredibly smooth. This technique is a testament to the fact that with a little understanding and patience, one can achieve professional-quality results using simple kitchen tools.
Ingredients You’ll Need
To embark on this delightful culinary adventure, you will need a few simple ingredients, each playing a vital role in the creation of your creamy, homemade vegan ice cream. The beauty of this recipe lies in its accessibility, requiring components that are readily available in most grocery stores. I have carefully selected these ingredients to ensure optimal flavor, texture, and ease of preparation, allowing you to create a gourmet-quality dessert with minimal effort.
The Foundation: Full-Fat Coconut Milk or Cream
•2 cans (approx. 800 ml) full-fat coconut milk or cream, chilled overnight: This is the cornerstone of our coconut milk vegan ice cream. The chilling process is absolutely crucial, as it allows the thick, rich cream to separate from the watery liquid. It is this thick cream that provides the necessary fat content for a truly creamy, non-icy texture. I always recommend chilling the cans in the refrigerator for at least 12 hours, or even better, overnight, to ensure maximum separation. When you open the cans, you will find a solid layer of cream at the top, which is what we will be using. The remaining coconut water can be reserved for smoothies or other culinary uses.
The Sweetener: Dates or Maple Syrup
•14–16 dates, pitted and rehydrated (or ⅔ cup maple syrup): Here, you have a choice between two excellent natural sweeteners, each offering a unique flavor profile and texture contribution. Dates provide a rich, caramel-like sweetness and a natural stickiness that aids in the ice cream’s scoopability. If using dates, ensure they are pitted and rehydrated by soaking them in warm water for about 10-15 minutes until softened. This makes them easier to blend into a smooth paste. Alternatively, pure maple syrup offers a clean, delicate sweetness that complements the coconut beautifully. Both options are fantastic, so choose based on your preference and what you have on hand.
The Smoother: Unsweetened Almond Milk (Optional)
•⅓–½ cup unsweetened almond milk (optional, to smooth consistency): While optional, I highly recommend including this ingredient, especially if you are using dates as your sweetener. A small amount of unsweetened almond milk helps to achieve a perfectly smooth consistency in the base mixture, ensuring that there are no lingering date chunks. It also contributes to the overall creaminess without diluting the rich coconut flavor. If you prefer a slightly thicker ice cream, you can start with the smaller amount and add more as needed to reach your desired consistency.
Optional Add-ins: Elevate Your Creation
•Optional add-ins: chocolate chips, nuts, fruit purée, nut butter, cocoa powder—added before freezing: This is where you can truly unleash your creativity and customize your coconut milk vegan ice cream to your heart’s content. The possibilities are endless! Vegan chocolate chips add a delightful crunch and rich flavor, while chopped nuts provide a satisfying texture contrast. Fruit purées, such as berry or mango, can infuse your ice cream with vibrant fruity notes. A swirl of nut butter adds an extra layer of richness and flavor, and cocoa powder can transform your creation into a decadent chocolate delight. Remember to add these mix-ins just before transferring the mixture to the freezer to ensure they are evenly distributed throughout.
Essential Kitchen Tools
One of the many advantages of this no-machine recipe is that it requires only basic kitchen tools, most of which you likely already own. You do not need any specialized or expensive equipment to achieve a perfectly creamy and delicious result. This accessibility makes it an ideal recipe for anyone looking to venture into the world of homemade vegan desserts without a significant investment.
•Blender or food processor: Essential for creating a smooth date paste if you choose to use dates as your sweetener. It is also useful for blending any fruit purées you might want to incorporate.
•Large mixing bowls: You will need at least two large mixing bowls: one for whipping the coconut cream and another for combining the base ingredients.
•Electric mixer or whisk: Crucial for whipping the chilled coconut cream to stiff peaks. An electric mixer will make this process much faster and easier, but a good old-fashioned whisk and some arm strength will also do the trick.
•Rubber spatula: Indispensable for gently folding the whipped cream into the base mixture, ensuring that you preserve as much air as possible for that light, airy texture.
•Loaf pan or freezer-safe container: The vessel in which your ice cream will freeze. Any freezer-safe container with a lid will work, but a loaf pan is often ideal for easy scooping.
•Parchment paper: A simple yet effective tool for preventing ice crystals from forming on the surface of your ice cream during freezing. This small detail makes a significant difference in the final texture.
Step-by-Step Instructions for Perfection
Creating this creamy coconut milk vegan ice cream is a straightforward process, broken down into a few simple steps. Each stage is designed to ensure optimal texture and flavor, guiding you towards a truly delightful homemade dessert. I will walk you through each step, providing insights and tips to guarantee your success.
Step 1: Prep Coconut Cream
This initial step is paramount for achieving the desired creamy consistency. The success of your no-churn ice cream hinges on the proper preparation of the coconut cream.
1.Refrigerate coconut cans overnight so the cream separates: As mentioned earlier, chilling the full-fat coconut milk or cream cans overnight is non-negotiable. This allows the dense, fatty cream to solidify and rise to the top, separating from the thinner coconut water at the bottom. This separation is key to obtaining the rich, thick cream necessary for a luxurious ice cream texture.
2.Scoop the thick cream into a chilled mixing bowl; reserve water for smoothies: Once the cans are thoroughly chilled, carefully open them without shaking. You will see a distinct layer of thick, solid coconut cream at the top. Gently scoop this cream into a large mixing bowl that has also been chilled (I often place my mixing bowl and whisk attachments in the freezer for 15-20 minutes before starting). Be careful not to incorporate any of the watery liquid from the bottom of the can. This reserved coconut water is excellent for adding to smoothies, curries, or other recipes, so do not discard it.
Step 2: Make Sweetener
This step focuses on preparing your chosen natural sweetener, ensuring it is ready to be seamlessly incorporated into the ice cream base.
1.Blend dates with a splash of their soaking water until paste-like: If you have opted for dates as your sweetener, drain them after rehydration (reserving a small amount of the soaking water). Place the softened, pitted dates in a blender or food processor. Add a splash of the reserved soaking water, just enough to help the blades move and create a smooth, thick paste. Blend until absolutely no chunks remain, ensuring a uniform sweetness and texture in your ice cream.
2.Alternatively, measure ⅔ cup maple syrup: If maple syrup is your sweetener of choice, simply measure out ⅔ cup. There is no need for blending or additional preparation; it is ready to be used directly.

Step 3: Whip the Cream
This is the magical step where the chilled coconut cream transforms into a light, airy, and stable base for our ice cream. This aeration is what gives our no-churn ice cream its delightful texture.
•Whip the coconut cream to stiff peaks (5–10 minutes): Using an electric mixer (or a whisk and considerable arm strength), begin whipping the chilled coconut cream. Start on a low speed to break up any initial lumps, then gradually increase to high speed. Continue whipping until the cream forms stiff peaks. This means that when you lift the beaters, the cream holds its shape firmly and does not droop. Be vigilant and avoid over-whipping, as it can cause the cream to become grainy. The process typically takes between 5 to 10 minutes, depending on the power of your mixer and the temperature of your cream and bowl.
Step 4: Combine Base
With the whipped cream ready, it is time to gently combine it with the sweetened base, preserving the precious air incorporated in the previous step.
1.In a bowl, stir together vanilla, almond milk, and date paste (or maple syrup): In a separate large mixing bowl, combine the vanilla extract (if using), the unsweetened almond milk, and your prepared date paste or maple syrup. Whisk these ingredients together until they are thoroughly combined and the mixture is smooth. This creates a flavorful and sweet foundation for your ice cream.
2.Gently fold this into the whipped coconut cream to retain airiness: This is a crucial technique. Add about one-third of the whipped coconut cream to the sweetened base mixture. Using a rubber spatula, gently fold it in. The motion should be light and deliberate: slide the spatula down the side of the bowl, across the bottom, and up the opposite side, turning the bowl slightly with each fold. This initial addition lightens the base, making it easier to incorporate the remaining whipped cream without deflating it. Continue adding the remaining whipped cream in two more additions, folding gently until no streaks of white remain. The goal is to maintain as much air as possible, as this directly contributes to the final creaminess of your coconut milk vegan ice cream.
Step 5: Add Mix-ins (optional)
This is your opportunity to personalize your ice cream with delightful textures and flavors, transforming it into a truly unique creation.
•Stir in extras like vegan chocolate chips, berry purée, or nuts just before freezing: If you desire to add any optional mix-ins, now is the time. Gently fold in your chosen additions—be it vegan chocolate chips, a vibrant berry purée, crunchy nuts, or a swirl of cocoa powder—into the combined ice cream mixture. Ensure they are evenly distributed but avoid overmixing, which could deflate the airy texture you have worked so hard to achieve. This step allows for endless customization, catering to every palate and preference.
Step 6: Freeze
The final preparation step before the magic of freezing takes over. Proper freezing technique is essential for preventing ice crystals and ensuring a smooth, scoopable result.
1.Transfer to a freezer-safe container, press parchment film atop to reduce ice crystals, and cover: Carefully pour the ice cream mixture into your chosen loaf pan or freezer-safe container. Smooth the top with your spatula. Now, for a game-changing tip: press a piece of parchment paper directly onto the surface of the ice cream, ensuring it touches the entire surface. This creates a barrier that prevents air from reaching the ice cream, which is the primary cause of ice crystal formation. Finally, cover the container with a lid or aluminum foil for an extra layer of protection against freezer burn and odors.
2.Freeze for at least 4–6 hours, or overnight: Place the covered container in the freezer. For optimal results, allow it to freeze for a minimum of 4 to 6 hours, or preferably overnight. This extended freezing time ensures that the ice cream is thoroughly set and reaches its ideal creamy consistency. Patience is a virtue in this final stage, as it directly impacts the quality of your finished product.
Step 7: Serve
The moment of truth! Serving your homemade coconut milk vegan ice cream correctly ensures the best possible experience, allowing you to fully appreciate its creamy texture and rich flavor.
1.Remove 10–15 minutes before scooping for optimal texture: Homemade ice cream, especially those without commercial stabilizers, tends to freeze harder than store-bought varieties. To achieve the perfect scoopable consistency, remove the container from the freezer about 10 to 15 minutes before you plan to serve it. This brief resting period allows the ice cream to soften slightly, making it easier to scoop and enhancing its creamy mouthfeel.
2.Keep frozen, and enjoy within 2 weeks: Store any leftover ice cream in the freezer, ensuring the parchment paper remains pressed against the surface and the container is tightly sealed. For the best quality, I recommend enjoying your homemade coconut milk vegan ice cream within two weeks. While it may last longer, its texture and flavor are at their peak within this timeframe.
Creative Variations to Explore
While the classic coconut milk vegan ice cream is a delight on its own, one of the joys of homemade desserts is the freedom to experiment and create new flavor combinations. I have explored several variations that are equally delightful, allowing you to customize this recipe to suit your preferences or to simply add a touch of culinary adventure to your repertoire. These suggestions are merely starting points; feel free to let your imagination guide you.
Chocolate Ripple: A Decadent Twist
For the chocolate lovers among us, this variation transforms the classic into a rich, indulgent treat. The addition of cocoa powder or chocolate sauce creates a beautiful ripple effect and a deep, satisfying chocolate flavor.
•Fold in 2 Tbsp unsweetened cocoa powder or swirl in vegan chocolate sauce before freezing: To create a chocolate-infused ice cream, you have two excellent options. You can gently fold 2 tablespoons of unsweetened cocoa powder into the combined ice cream mixture in Step 4. This will give you a uniformly chocolate-flavored ice cream. Alternatively, for a visually stunning and intensely flavored chocolate ripple, swirl in vegan chocolate sauce just before transferring the mixture to the freezer in Step 6. Use a knife or a skewer to create beautiful patterns, ensuring pockets of rich chocolate throughout your creamy creation.
Tropical Fruit: A Burst of Sunshine
Embrace the vibrant flavors of the tropics by incorporating fresh fruit purées into your coconut milk vegan ice cream. This variation adds a refreshing tang and a burst of natural sweetness, perfect for a warm day.
•Blend ½ mango or ½ cup pineapple purée into the base: For a delightful tropical twist, blend half a ripe mango or half a cup of fresh pineapple into a smooth purée. Gently fold this fruit purée into the ice cream base mixture in Step 4, before adding the whipped coconut cream. The natural sweetness and acidity of the fruit will complement the coconut beautifully, creating a refreshing and exotic flavor profile. This is an excellent way to use seasonal fruits and add a personalized touch to your dessert.
Spiced: Warm and Aromatic Notes
For those who appreciate a hint of warmth and complexity in their desserts, adding spices can elevate your coconut milk vegan ice cream to a new level. These aromatic additions create a comforting and sophisticated flavor experience.
•Sprinkle in ½ tsp cinnamon, nutmeg, or ¼ tsp cardamom for warm notes: During Step 4, when you are combining the vanilla, almond milk, and sweetener, consider adding a touch of spice. A half teaspoon of ground cinnamon or nutmeg will infuse your ice cream with a classic warmth, reminiscent of cozy autumn evenings. For a more exotic and fragrant note, a quarter teaspoon of ground cardamom offers a unique and captivating aroma. These spices blend seamlessly with the coconut, creating a harmonious and deeply satisfying flavor profile that is both familiar and intriguing.
Common Mistakes to Avoid
Through my own trials and errors, I have learned valuable lessons that I wish to impart to you, saving you from potential disappointments. While this recipe is remarkably forgiving, there are a few common pitfalls that, if avoided, will guarantee a consistently perfect result. Paying attention to these details will ensure your coconut milk vegan ice cream turns out creamy, smooth, and utterly delicious every single time.
1. Not Chilling Coconut Cans Overnight
This is perhaps the most critical mistake one can make. If your coconut cans are not thoroughly chilled, the cream will not separate properly from the water. You will end up with a runny mixture that will not whip to stiff peaks, resulting in an icy, rather than creamy, ice cream. Always plan ahead and refrigerate your cans for at least 12 hours, or preferably overnight, to ensure optimal separation and a successful outcome.
2. Incorporating Coconut Water into the Cream
When scooping the thick coconut cream from the chilled cans, it is imperative to avoid including any of the watery liquid at the bottom. This coconut water will dilute the fat content of the cream, hindering its ability to whip properly and leading to a less creamy, more icy final product. Be meticulous in your scooping, ensuring you only gather the solid, rich cream.
3. Over-Whipping the Coconut Cream
While whipping to stiff peaks is essential, over-whipping can lead to a grainy or curdled texture. Unlike dairy cream, coconut cream can become a bit crumbly if whipped for too long. Keep a close eye on the consistency as you whip, stopping as soon as firm peaks are achieved. The cream should be smooth and glossy, not lumpy or separated.
4. Stirring Vigorously Instead of Folding
The gentle folding technique is paramount for preserving the air bubbles incorporated during whipping. If you stir vigorously, you will deflate the whipped cream, resulting in a dense, heavy ice cream that lacks the desired lightness and creaminess. Remember the gentle motion: down, across, and up, turning the bowl with each fold. Patience and a light hand are key here.
5. Not Using Parchment Paper Directly on the Surface
This simple trick is a game-changer for preventing ice crystals from forming on the surface of your ice cream. Air exposure during freezing is the primary culprit behind surface ice. By pressing parchment paper directly onto the ice cream’s surface, you create a protective barrier that seals out air, ensuring a consistently smooth texture from top to bottom. Do not skip this step; it makes a significant difference.
Frequently Asked Questions
To provide further clarity and address common queries, I have compiled a list of frequently asked questions regarding this coconut milk vegan ice cream recipe. These answers aim to enhance your understanding and ensure your success in creating this delightful dairy-free treat.
How long will this ice cream keep in the freezer?
For optimal quality, I recommend enjoying this homemade coconut milk vegan ice cream within 2 weeks. While it may remain edible for longer, its texture and flavor are at their peak within this timeframe. Always ensure it is stored in an airtight container with parchment paper pressed directly against the surface to prevent ice crystals and freezer burn.
Can I use frozen coconut milk?
While this recipe specifically calls for canned full-fat coconut milk or cream, using frozen coconut milk is generally not recommended for this particular application. The freezing and thawing process can alter the texture of the coconut milk, making it less suitable for whipping to stiff peaks. For the best results, stick to chilled canned full-fat coconut milk or cream as specified.
Why is my ice cream too hard to scoop?
Homemade ice cream, especially those made without commercial stabilizers, tends to freeze harder than store-bought varieties. If your ice cream is too hard to scoop, simply allow it to sit at room temperature for 10 to 15 minutes before serving. This brief resting period will soften it to the perfect scoopable consistency. Ensure your freezer is not set to an excessively low temperature, as this can also contribute to hardness.
Can I make this recipe nut-free?
Absolutely! This recipe is inherently nut-free if you omit the optional almond milk and any nut-based add-ins. The core ingredients—full-fat coconut milk/cream, dates/maple syrup—are naturally nut-free. If you choose to use the optional almond milk for smoothing consistency, you can easily substitute it with another plant-based milk like oat milk or soy milk to maintain a nut-free profile. Always double-check the labels of all your ingredients to ensure they meet your dietary requirements.
A Sweet Legacy of Simplicity
This coconut milk vegan ice cream recipe has become a cherished staple in my kitchen, a testament to the idea that some of the most profound culinary joys stem from simplicity. It is a recipe that I have shared with friends and family, watching their faces light up with surprise and delight as they discover that a truly creamy, dairy-free ice cream can be made so effortlessly at home. The initial skepticism often gives way to genuine amazement, followed by requests for the recipe itself. It is a small, sweet victory against the notion that deliciousness must always be complicated.
What I love most about this recipe is its ability to evoke a sense of tropical escape with every spoonful. The rich, exotic flavor of coconut, combined with the natural sweetness of dates or maple syrup, creates a harmonious symphony of tastes that transports me to sun-drenched beaches and swaying palm trees. It is more than just a dessert; it is an experience, a moment of pure, unadulterated pleasure that reminds me of the simple joys in life. This recipe is a celebration of plant-based ingredients, a demonstration of how they can be transformed into something truly extraordinary, proving that sometimes, the simplest path leads to the most remarkable destinations. I sincerely hope this recipe brings as much joy and creamy delight to your kitchen as it has to mine.
Disclaimer: The information provided in this article is for educational and informational purposes only, and does not constitute professional advice. It is not intended to be a substitute for professional medical advice, diagnosis, or treatment. Always seek the advice of your physician or other qualified health provider with any questions you may have regarding a medical condition.